Web content
The web content Vizual offers two different modes. The URL and the code mode. With the URL mode any web pages can be displayed in an iFrame. Exceptions are websites whose web server does not allow embedding. This article describes the Code mode. With the Code mode complex JavaScript widgets can be integrated or completely own vizuals can be developed.
The Code Editor
The Web Content Vizual can be used to extend an AnyViz project with a custom user interface component. The control is developed using web technology with the code editor, which consists of four components:
- HTML: Defines the content of the control
- CSS: Contains the styling
- JavaScript: Custom JavaScript code of the control
- Interface: Interface for data exchange with the cloud project
Structure
The structure of the web content inspection is fixed. No HTML tags like html, head or body are required. The result is an HTML document with the following structure:
<!DOCTYPE html>
<html>
    <head>
        <style>[CSS Content]</style>
    <head>
    <body>
        [HTML Content]
        <script>[JavaScript Content]</script>
    </body>
</html>
Loading external content
In addition to adding HTML tags and content, the HTML editor can also be used to load any external resources. These can be JavaScript libraries like jQuery or complex HTML content like Google Maps or weather widgets.

Coding interface
Data can be exchanged between the Web Control and the AnyViz project via the AnyViz interface. The interface must first be activated. You can then drag and drop tags into the dialog.

All functions of the interface are located in the anyviz namespace and can be used via JavaScript. Take a look at the application example.

Each tag is of type TagExchange and has the following properties:
interface TagExchange<T> {
    /**Returns the name of the tag*/
    readonly displayName: string;

    /**Returns the unit of the tag*/
    readonly unit: string;

    /**Registers for tag updates. The action is triggered every time the value 	 of the tag changes.
     * @param action: The callback if the tag value changes*/
    onChange(action: (value: T) => void): void;

    /**Writes a value to the tag
     * @param value: The new tag value*/
    write(value: T): void;

    /** Requests the compressed historical data of the tag
     * @param start: Start time
     * @param end: End time
     * @param mode: Compression mode
     * @param interval: Compression interval
     * @param action: Callback with the requested historical values*/
    getHistoryCompressed(start: Date, end: Date, mode: number, interval: number, action: (data: TagHistoryResult) => void): void;
}

interface TagHistoryResult {
    Values: TagHistoryValue[];
}

interface TagHistoryValue {
    ValueTime: Date;
	Value: number;
}
Debugging
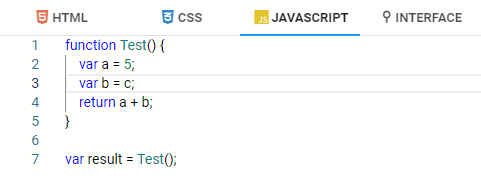
The console output of the web browser developer tools can be used for debugging. In the following example, the symbol "c" is undefined. The console output of the browser gives an indication of this:


Note: Since the output is constantly updated, error output occurs in the console already during input. These can be ignored. It may be useful to clear the console and then check the output again.
Application example
The following application example shows the name and the value of a tag. In addition, the value of the tag is increased via a button.
HTML
<div>
    <span id="varName"></span>
    <span id="varVal"></span>
</div>
<button onclick="increment()">Increment</button>
CSS
#varName {
    color: royalblue;
    font-weight: bold;
}

button {
    cursor: pointer;
}
JavaScript
/**@type {number}*/
var currentVal = null;
var nameEl = document.getElementById('varName');
nameEl.innerHTML = anyviz.tags.Temperature.displayName + ':';

anyviz.tags.Temperature.onChange(function(val) {
    currentVal = val;
    var unit = anyviz.tags.Temperature.unit;
    document.getElementById('varVal').innerHTML = val + unit;
});

function increment() {
    if (currentVal == null)
        return;

    anyviz.tags.Temperature.write(currentVal + 1);
}
Interface

Result
